The Model 01: an heirloom-grade keyboard for serious typists
Created by Keyboardio
With a hardwood body, mechanical switches & custom-sculpted keycaps, it's a dream to type on. It comes with source code & a screwdriver
Latest Updates from Our Project:
Day 648: Plastics, Pollution, and Programming
almost 9 years ago
– Thu, May 04, 2017 at 02:29:29 PM
TL;DR: Plastic parts are looking good; Wooden parts are looking good; Raw material costs in China are skyrocketing; Open source is amazing.
Hello from Oakland!
This is part two of our March 2017 update. If you missed part one last week, you can read it on Kickstarter.
Baseplates
One of the ongoing problems we've had with our manufacturer is the quality of the plastic baseplates being produced for us.
First, here's a recap of the saga of the baseplates up to now.
When we started this process, we'd specified metal baseplates. We'd also specified press-fit nuts and standoffs for anchoring the keyplates and wooden enclosures to the baseplate.
The factory proposed swapping out the metal for plastic. While we were a little bit nervous about this, plastic has the dual advantages of weighing less and better fitting our design. With the plastic baseplates, the factory was able to mold in features to help protect the RJ45 and Type C jacks. They were able to mold the metal tripod mounts right into the plastic.
And back when we thought there were going to be flip-out feet on the bottom of the keyboard, they were going to be able to hide the feet inside baseplates.
Well, it turned out that the flip-out feet just weren't going to work. The factory took a gamble and had their partner start on the baseplate injection molding tooling before we signed off on this part of the design.
The first versions of the baseplates came back with numerous "hot points" where you could see sinking due to the plastic cooling at a different rate. That's not great, but is entirely normal for a first (called a "T0") injection sample.
Entirely aside from the issue with the feet, the quality of the baseplates provided by the factory's partner was not up to snuff. There were many issues, both small and large. The biggest issues centered around the quality of the tooling. The internal "ribbing" on the parts looked like they'd been hand-cut by a CNC operator. The lines were too thin and not quite in the right place. There were places that two of the ribs were supposed to touch, but instead they were about a millimeter apart. Because the structural stability of the part depends on those ribs being fused together, this was less than ideal.
We asked them to try again.
The injection factory blew their self-imposed deadline by a week or two. The parts they came back with looked a little better, but as we looked at the details, we found that the structural lines hadn't really been made thicker. They'd just cut new lines next to them which… almost lined up.
This is right about when the factory read them the riot act. They told the injection supplier they had one more chance to fix things.
The injection factory blew their self-imposed deadline by a week or two. The next version was a little better, but still just didn't match the design files sent to them in a number of places. What's worse was that the injection factory thought they'd done a decent job.
By now, it was early January and we were at T5 or T6. We were pretty frustrated.
The factory relented and asked the injection molding factory to take one more shot at things.
The injection factory blew their self-imposed deadline by a week or two. The samples they came out with were ok, but still not production quality.
This was the point at which our factory started shopping for a new injection molding partner in earnest. Just before Chinese New Year, the factory told us which of the three bids for the baseplates they thought we should accept. The only real details we had were the pricing and the factory's opinion, so we ran with it.
They told us that the new factory expected to finish tooling the week of March 5, with samples sometime that week.
Once Jesse got to China, the factory took Jesse to visit the new baseplate supplier. They confirmed that tooling and "T0" injection samples would be ready on March 8.
The tooling supplier showed us the work-in-progress injection molds, as well as their fancy test equipment.
Well, March 8 rolled around and the injection factory asked if we could delay our visit until the afternoon. With a little bit of trepidation, we agreed. When we showed up sometime after lunch, we were brought straight to one of their injection machines. The factory manager, in a suit, was pulling out baseplates, "hot off the presses."
The first "T0" sample of the left baseplate from the new supplier
We took them upstairs to the injection shop's offices, pulled out our sharpies and started marking up issues as we found them. There were a reasonable number of "hot point" sinkholes, but that's very much part for the course as molds get dialed in.
The first samples didn’t have tripod mounts on the bottom. To add them, it was just a matter of adding tripod mount inserts into the tool as it made each sample. We then found that the tripod screw inserts, while exactly as long as we'd specified, were missing a bit of headroom above them. The problem with this is that longer tripod screws wouldn't be able to screw all the way into the baseplates, leaving them extra wobbly. We'd picked a depth of 6mm because that's what the ISO standard for camera tripod mounts says. Perhaps unsurprisingly, some of our test commercially available camera tripods actually have screws as long as 7 or 8mm. After talking things through with the injection supplier, we decided to switch to 10mm long threaded inserts. There was a little bit of stress because the injection factory's supplier claimed they couldn't actually do 10mm inserts while still making them from stainless steel. We'd have to switch to brass or galvanized iron. This seemed a little bit nutty to us. We agreed that brass was the better of the two choices. (While it might deform a little bit, it's unlikely to start rusting after repeated use wears it down.) The next day, with help from our friends at HWTrek, we got the injection factory to recant and switch back to stainless steel. We're still not quite sure what happened, but we're happy with the result.
Back to the baseplate inspection. These samples looked good. Surprisingly good. The baseplate supplier agreed to run the samples through their fancy 3D measurement machine to compare them to the CAD designs. We handed them our marked-up samples showing off the issues we'd found.
A report showing how well the first version of the new baseplates matched the CAD designs
At that point, it was again time to talk about texture. The injection factory pulled out their texture sample card. We settled on texture number 48, which is a moderately dense texture we found both attractive and a little bit "grippy."
The new supplier's texture card, showing off the different options available to us
After that, the factory's R&D manager marked up samples with a white paint pen to show the surfaces that should have the texture applied. The injection molding factory said they expected to be able to turn new samples fixing the substantive issues by the time Jesse left China four days later. They warned that we shouldn't expect the texture to be applied yet.
The left baseplate marked up to show which parts would get texture 48 and which would stay smooth
Lo and behold, four hours before Jesse left China, a team from the factory met him at his hotel with a fully assembled sample keyboard. Including new textured samples of the baseplates. We’re very happy with the new samples, though the factory found a few small things that needed touching up. The baseplate supplier is making those changes now.
The stands
We didn't know this until we turned up at the factory, but the supplier that the factory selected for the baseplates is also the supplier making the stands.
The story for the stands is much the same as the story for the baseplates, starting from the injection mold factory's promise date of March 8. Shortly after the sample baseplates came popping out of the injection molding machine, sets of stands started to accumulate on a work table.
Getting the first stand made took months, but after that, it felt a bit like "The Trouble with Tribbles"
We went through the same process as with the baseplates, looking for hot points and other molding issues.
If you look carefully, you can see some small issues with the stand circled in green marker
One thing that came up was that the screw bosses on the top halves of the stands were inconsistent sizes. We figured this out as we tried to assemble a stand. One or two screws fit well, but most of them just spun in place, never finding any plastic to bite into.
Another problem was that in the top half of the stands, a bit of the support structure seemed to be a mite short. This resulted in the part feeling slightly less sturdy.
The molding factory promised to run the stands through their measuring system, too.
We marked up a sample stand, showing which parts should be textured and which parts should be left flat so the adhesive for the feet and top piece would get a better grip.
Four days later, the factory presented us with a pair of stands with just about every issue corrected.
One item we've found since is that the screw hole in the stands is...not quite a circle. Our best guess is that the mechanical engineer modeled the hole as a cylinder, but started from the wrong "ground plane." In testing, this issue doesn't affect the keyboard's usability or stability at all (nor is it visible when the keyboard is on the stands), but it makes us a little bit sad to have missed when it was still an easy fix.
Screws for the stand
The tripod screws we're using for the stand have been working pretty well, but the factory thinks they can be improved.
Apparently, the way all-metal screws like this are made is that they're CNCed. Because of this, the cost difference between a "standard" screw and a custom screw is minimal. They tell us that the lead-time for this new screw is similar to the lead time for the "standard" design, too.
The factory had a sample of a custom screw made and is sending it along to us for our review and (possibly) our blessing.
Center bars and rails
The center bars and rails are the bits that keep the two halves of the Model 01 connected in a flat or tented configuration. You don't have to use them, but many of us want our keyboards to be one-piece units most of the time.
The design of the center bars and rails has been fixed for months, but the factory has been working through fit and warping issues.
These parts are going to get a lot of weird stresses put on them. On the factory's advice, we ended up deciding to make them out of glass-filled nylon rather than ABS+PC. Glass-filled nylon should be more resilient.
As it turns out, the factory has had a hard time getting the nylon versions of the bars to lie flat. When they've come out of the molds, they've ended up a little bit warped. This is… less than ideal for a part whose role in the world is to be flat and keep another part flat and aligned. The factory's been able to make nice, flat versions out of ABS and ABS+Polycarbonate for months. With the glass-filled nylon version, they've been stuck tweaking the injection molding machine's pressure, cycle time, and other parameters.
They even went so far as to build a straightening jig to fix the parts as they come out of the mold. It works similar to a how a set of braces helps a poor tween's teeth end up nice and straight. This seemed like a bit of a cop-out to us, so we asked around and found out that this is a relatively common strategy for parts like this that have warping problems.
These are the jigs the factory built to help make sure the center bars end up nice and flat
In the past couple days, the factory finally sent over pictures of glass-filled nylon center bars that look to be perfectly flat. They say that the solution ended up being a change to the percentage of glass in the nylon.
Previous versions of the rails that screw onto the bottoms of the enclosures have been a little bit loose, resulting in unnecessary wobbling. They've gotten a tiny revision to make sure that they fit snugly into the center bars.
The latest versions of the center bars look to be nice and flat
We're excited to test new samples of both parts when the factory sends them to us in the next week.
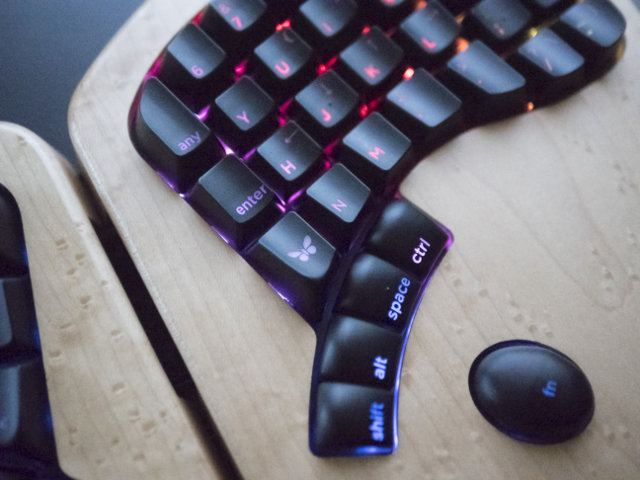
Keycap laser engraving
One of the most frustrating aspects of the preparation for mass production has been an ongoing series of quality issues with the painting and laser-engraving of the keycaps.
The first paint and laser supplier the factory was working with promised turnaround times of two to three days.
The first keycap samples they sent back had the key labels centered on the keycaps, when we'd specified that they should be anchored to the lower left hand corner.
The second samples that came back had the per-key alignment pretty much correct, but had put the left hand key labels on the right hand and vice-versa. Some labels ended up misspelled, which must have taken serious work, since we'd sent "camera-ready" copy.
The third samples just had... sloppy alignment. It looked like they'd gone in and modified our key layout to change the spacing between the symbols on a few keys and a number of keys had their labels engraved at a funny angle. A few keys had been engraved...upside down. We noticed that the sides of some of the keycaps didn't have great paint coverage.
This was the point at which we decided to stop trying to get the labels right until Jesse was on the ground in Shenzhen.
Early in the trip, he visited the keycap laser engraving factory in Dongguan, the next city over from Shenzhen. Their operation seemed pretty professional and they appeared to know what they were doing. Our questions about how things had gone so badly wrong got kind of weird answers, but the supplier asked that we give them a chance. They promised to carefully check every sample before they sent it back.
While there, we took the time to ask them about the UV clearcoating they spray onto the keys to protect them after laser engraving. We asked if we could pay extra for higher-quality UV clearcoat "paint". The factory boss said that we weren't going to see any real quality increase from changing it out. We asked about whether they could do multiple coats to protect your keycaps better. The boss said that they already do two coats. When we asked "how about three?", he told us that we'd be wasting our money and that two was really totally sufficient. We left with the understanding that they'd paint and engrave new samples and get them back to us in a few days.
It wasn't until a day later that we found out that this was a new laser engraving supplier and that the factory was ditching the first supplier.
Well, the promised keycaps didn't show up after two days. Or three. Or four. Or five. And then they finally showed up with exactly the same problems we'd seen before Jesse met with them.
After a very tense meeting, we finally figured out that somebody in the factory's logistics department had sent the keycaps out to the old supplier again.
Early this week, the factory finally sent us photographs of newly-engraved keycaps from the new supplier. They look much, much better. We see a few small issues, though we can't properly check them until the factory sends them to us.
The latest version of the keycap laser engraving looks much better than any previous version
One ongoing issue has been the quality of the painting toward the bottoms of the keycaps. This is because the "painting jig" for the keys places them too close together. When we asked why the painting jig packs the keys in so tight, we were told that it was designed to match the injection mold for the keycaps. And indeed it does. As best as we can tell, the keycap factory economized on steel when designing our mold, which has led to cascading problems down the line.
There's a second issue with the painting jigs. Because they're built without tall side-walls and ribbing, they have a tendency to, you guessed it, warp. This means that it's much harder for key labels to end up aligned correctly. This issue, at least, is easy to fix. The jig maker is currently modifying the jig design.
Our factory tells us that the painting and laser engraving supplier has committed to taking responsibility for high-quality painting and engraving of all keycaps. As we understand it, the current process has the painting and laser engraving supplier's staff manually moving keycaps between jigs to make sure there's plenty of space for the paint to coat the keycaps. On top of this, the factory has committed that their QC team will reject any keyset with an error.
This is, somewhat understandably, stressing us out a bit.
RJ45 cables
The two halves of the Model 01 are connected by an 8P8C RJ45 cable, known to most of the world as an "ethernet cable."
We've gone back and forth a number of times with the factory in our quest to get decent cables. The first few suppliers they reached out to had a hard time actually coughing up any sample cables at all, which isn't exactly a great sign for a cable company.
One of the first samples we got back had such long cables that it couldn't actually fit inside the Model 01.
Eventually, the factory found a cable supplier that seemed both willing and able to make us the cables we wanted.
We'd asked for samples of three different weights of cable: 24AWG, 26AWG and 28AWG. The goal was to find a cable that was heavy enough to get the power from one half of the keyboard to the other, but not so heavy (and stiff) that it was unwieldy. We ended up settling on the 26AWG cable weight for the 1M long cable.
The problem we're dealing with now is the short (10-15cm) cable. When we use 26 AWG cabling, it's stiff enough to put lateral stress on the RJ45 jacks on your keyboard when the two halves are connected by the center bar. If we ship with this cable, it will shorten the life of your keyboard. We've asked the factory to work with the cable supplier to find a more reasonable option. We showed them a "flat" cable as one possible solution, but the cable vendor nixed it, saying that they've seen far too many quality issues with those flat cables. We're hoping to hear back about the factory's meeting with the cable vendor in the next day or two. This isn't a major issue and should be pretty easy to resolve, but we have to actually, you know, resolve it.
USB Type C cables
We've previously talked about the Type C cable we thought we were going to use. Its construction was good. It met the part of the USB spec so many cables cheat on. (It had a 56k resistor to identify itself.)
There's just one problem with it that we didn't catch. Its Type C connector is big and blocky and… slightly out of spec physically, meaning that it doesn't mate cleanly with the Model 01 when the circuit board is inside the enclosure.
The factory is talking to the supplier, as well as other possible vendors. The long and short of it is that we may end up deciding to ship with "straight" USB A to Type C cables, rather than cables with a right-angle Type C connector. At the end of the day, a good cable with a solid connection is more important than the cable shape.
In a previous update, we mentioned we’d rejected a good-looking Type C cable because its internal resistor violated the USB specifications. One of us accidentally started to use the sample to charge a phone. The cable did a good job of reminding us that it was out of spec. It got so hot that the glue inside melted and leaked out!
We'd already decided not to use this cable, but when we saw it melt, we knew we'd made the right choice
Long lead-time electrical components
We’ve previously mentioned that the APA 102C LEDs we’re using are in short supply. We have enough on hand for the first 900 or so keyboards, but are still waiting on delivery of the rest of the order. The factory has a call in to the manufacturer to get a firm delivery date, but as of now, we have no reason to suspect that the LEDs are going to cause a delay in mass production.
The factory has about 500 keyboards worth of keyswitches on hand, with the balance to start showing up over the next month. This is later than we’d expected, but shouldn’t have a measurable impact on production. The factory had told us that their purchasing department was on top of switch procurement. When we asked them to confirm, they said that they had all of our switches sitting in their warehouse. When we asked them to confirm again, they realized that they’d made a mistake and only had 10% of the switches they thought they did.
The RJ45 jacks we’re using are another item with a bit of a longer lead time. These, at least, got ordered before Chinese New Year. The factory has enough of them on hand for the first 1800 keyboards and say that they’re expecting the balance of the order any day now.
As of now, the factory believes that none of the other electrical components they don’t have on hand have a lead time longer than a couple weeks.
Wooden parts
While in Shenzhen, we paid a visit to our wood supplier to check in on timelines for PVT, as well as a few special projects.
When we asked about the lead times for the enclosures for the first 100 units, we got a pleasant surprise. "Oh. Those are done. We have them in the warehouse. Do you want to see?"
Wooden enclosures for PVT keyboards are already done.
This was tied to another surprise. They'd gone ahead and made 100 sets of the stands out of wood. We hadn't asked them do and hadn't signed off on them, but they did it as a favor to the factory to help cut down timelines. They weren't actually thrilled about making the parts, since the "organic" contoured shapes are very slow to CNC.
There are a couple issues we're working through with the stands they made. The big one is that in some cases, their post-CNC sanding was a little bit aggressive, so some of the stands have a few edges that are a little flatter. We've asked them to go through the sets they've made and cull out the worst of the lot.
Our original plan had been to ship wooden stands with the PVT units because the plastic stands weren't going to be ready. Given the other schedule slippage, that's no longer an issue.
On the one hand, these are parts we didn't order. On the other, we really like the wood factory and they've done a lot of spec work for us over the past two years.
The current plan is to offer them as a special-order after-market accessory. More on this front as it develops.
After that, we talked a bit about the lead times for mass production. It sounds like the first 2000 keyboards worth of enclosures will take 3 weeks from when we say "go." The current plan is to say "go" once PVT units start arriving in folks hands and they verify that everything looks right.
Costs
One thing we haven't talked a whole lot about over the course of this project has been money. There are a bunch of reasons for that. Many of them center on us feeling uncomfortable talking about money in public.
We've been pretty frugal throughout this whole process. While we've had outside help, we haven't hired full time staff to work with us. Instead, we've brought in contractors for shorter gigs as we've needed their skills. We pay ourselves, but at nowhere near market rates. There have been times when we could have used more of your money to speed the project up, but we judged that doing so was more likely to hurt us down the road.
The upshot of this is that we've been in a very healthy cash position leading up to mass production.
One of the reasons we've been so conservative about cash is that it's been our plan to use most of the Kickstarter and preorder profit to invest in inventory via a larger initial order with our factory.
That's a very, very normal plan for a crowdfunding campaign. Heck, it's a big part of the "kickstart" in Kickstarter.
We've been finalizing everything with the factory, now that the keyboard's design is final, tooling is nearing completion, packaging has been designed, and accessories have been selected.
Even before Jesse went to Shenzhen, we'd been hearing stories from reputable sources about costs and lead-times for raw materials in China going up.
Even when you know it’s coming, a big increase in costs is never a welcome turn of events. The updated pricing we got from the factory just before Jesse left China was a good deal higher than the update we'd gotten before Chinese New year, spiking more than 20% due to materials costs. Some of the biggest jumps came in the costs of bare PCBs and the packaging itself. In the case of the packaging, it's not just that materials costs have gone up. We've ended up with something nicer and more protective than originally planned.
But really, everything from aluminum to ABS pellets to cardboard has gotten a bunch more expensive. The only thing that (thankfully) hasn't spiked is the price of the Canadian maple the enclosures are being milled from.
The factory is working to negotiate some of these increases with their suppliers and says they'll have an updated proposal for us this weekend.
On the one hand, this was a pretty big shock and we're pretty unhappy about it. On the other, the reason for most of the increases is something we support. China's been in the process of tightening environmental regulations and significantly increasing enforcement of those regulations.
Cardboard boxes are a lot more expensive than they had been because, we're told, the Chinese government has shut down a number of paper mills that were polluting the environment more than they should have.
So, where does this leave us?
We're still figuring that out.
We're not screwed.
This does not impact our ability to ship your keyboards.
It may or may not impact the number of keyboards we order for sale (rather than presale) to customers, as well as our ability to sell the Model 01 through channels (like brick and mortar boutiques or other websites) because there's less margin to go around.
While we're a bit stressed out about this, you don't need to be. We're being very careful to make sure that we still have enough cash on hand after ordering your keyboards to pay for shipping and to pay our taxes.
Right now, we need to sit tight and wait for the factory to finish negotiating with their suppliers. We know that the negotiated costs will go down a bit from the last quote. Once that's done, we have folks who have been doing this for many years helping us out with vetting and negotiating the quotation. They've already been doing spot checks of a couple items and are digging into a few issues for us.
Firmware
There's this particular feeling for an open source project author. It's somewhere between pride, awe and abject terror.
We're new parents, so we're not entirely sure, but we suspect that it's the same feeling you get when your kid moves out of the house.
In November 2013, Jesse created a trivial keyboard firmware for our prototype keyboards. He wrote it in an evening. While watching a movie. After having had a drink or two. (Jesse insists that while he was intoxicated when writing the first version of our firmware, he "never does this")
Over the course of our time at Highway 1 and through the progression of prototypes we've built, he tweaked the firmware, always planning to throw it away before keyboards ever got into customer hands.
Last October, this guy showed up on #keyboardio, our IRC channel, to chat about the Model 01's firmware. He quickly started to submit small patches to fix obvious bugs. And then we started talking about "advanced" features.
Before we knew it, Algernon (Gergely Nagy) had built some libraries for the Model 01's Firmware. (At that point, we might have been calling it “Arduino-Keyboard” or “Model01-Firmware”). But he quickly found that the stuff he wanted to do wasn't easy to do in the firmware structure we'd built.
He created his own firmware for the Model 01 called Akela. It had all sorts of neat features we really wanted in our firmware.
It should be noted that at this point, he didn't have a Model 01 prototype, but it was clear to us that if anyone in the world should have one, it was him. It took a little bit of work, but we got FedEx to deliver a keyboard to him in Budapest on December 23. You can read about it on his blog: https://asylum.madhouse-project.org/blog/2016/12/24/the-package/
That's when things really started to take off.
We somehow suckered Algernon into porting all of his cool code back into the Keyboardio firmware, developing a plugin infrastructure, and then splitting out just about all the functionality into plugins.
Before we knew it, our firmware had a couple of dozen plugins spread across the "Keyboardio" and "Akela" namespaces.
Algernon mentioned that there was another keyboard maker he'd been talking to who thought they might be interested in running our firmware on their board. He asked if we'd have a problem with that.
We don't have a problem with that. It's pretty much the validation of everything we'd hoped for with the firmware. The more keyboards running our firmware, the more users we have. That directly drives more people to be interested in hacking on the firmware, resulting in better firmware for everybody.
This did make one thing abundantly clear. Calling the firmware "Keyboardio Firmware" was no longer right. We wanted a name that references Keyboardio and/or the Model 01, but was broader and more inclusive.
We ended up settling on Kaleidoscope. A kaleidoscope make an infinite number of beautiful and unique works of art from a bunch of shiny baubles. Plugins are like shiny baubles, especially when they control neat LED effects.
As it happens, "kaleidoscope" is also one of the collective nouns for butterflies.
After we settled on the name, Algernon went and renamed all of our code and all of his code into the shared namespace.
Over the past couple weeks, he's been churning out new functionality so fast we can barely keep up.
First was AlphaSquare, which uses the Model 01's LEDs to draw ASCII characters on your keyboard in a 4x4 pixel font.
Then came Focus, our long-promised bidirectional serial communication protocol. Plugins can register themselves with Focus to either send data back to your computer or let themselves be configured or updated remotely.
Over the past couple weeks, Algernon has been working on moving keyboard layouts and LED effects out of static program memory into EEPROM. What that means is that you're now able to use Focus to change onboard key layouts without needing to change the Model 01's program. Based on an offhand comment from Jesse on IRC, Algernon extended this support to let you remap a keyboard's layout from the keyboard, using a scheme similar to the way older Kinesis Advantage keyboards did it.
One of the cool things he’s put together that he hasn’t announced anywhere yet (but said we could talk about here) is the first version of a tool that changes the Model 01’s keymaps based on your current application. His first implementation is for Linux, but the concept is very similar to a prototype we built for macOS a while back, so we’re pretty confident that ports for more platforms should be pretty straightforward.
Next up, it sounds like he might be working on a "fingerpainting" mode for LED lighting effects or letting you "record" macros on the keyboard.
Chrysalis
Of course, not everybody wants to hack their keyboard from their keyboard or to use a serial console to change their layout.
We've long promised a GUI tool for configuring your keyboard. As recently as a month ago, we were 100% sure that this was going to be something we built...a bit later, after we'd had some time to recuperate from shipping your keyboards.
Well, Algernon and @thebaronhimself (Simon-Claudius Wystrach) got to chatting about things on IRC and somehow Simon-Claudius ended up volunteering to start building the desktop GUI.
So far, our only contributions have been suggesting the name and some encouragement.
It's very much early days, but Simon-Claudius sent over this animation of the core of the SVG+Javascript code that will let you use your mouse to configure your keyboard. We're very, very excited.
A work-in-progress view of Chrysalis
What’s next
Right now, we’re working on getting the manufacturing and shipping logistics set up while we wait for the latest sample parts from the factory and the factory waits for the keycap tooling supplier to finish fixing the issues we talked about in the last update. As we wrote last time, the ETA for all of that to be wrapped up is early April.
If all goes according to plan, the next backer update should find Jesse back on the ground in Shenzhen doing quality control checks on the first 100 Model 01s to roll off the line. If that’s not the case, we’ll be back next month with more exciting stories from the trenches.
<3 j+k
Day 642: Packaging, PVT Prep, and IP Piracy
almost 9 years ago
– Thu, Mar 30, 2017 at 09:52:19 PM
TL;DR: PVT is planned for early April; Somebody tried to steal our name; A preview of your unboxing experience; Expect part two of this update next week.
Hello from Oakland!
We’re sorry this update is late
We're really sorry for the delay in this update. Since China was closed for business for about 3 weeks after our January update, we figured we were going to devote the February update to writing about the Model 01's software. We also thought that we were going to send that update just before Jesse went back to Shenzhen at the end of February.
Time just got away from us a bit and we missed. Once Jesse was in Shenzhen, things were moving fast enough that we ended up deciding to delay until he was back home.
When the first half of this month’s update came in at more than 3500 words, we decided to split it in two. You should expect the second installment next week.
Schedule update
Right now, it’s looking like the first 100 units will come off the assembly line in early April. A few of those keyboards will be earmarked for things like FCC testing and taking marketing photos, but almost all of them are destined for Kickstarter backers.
The item that's currently driving that date is fixing the insides of the keycaps. You can read a bit about that later in this update.
If everything looks good, that’s when we ask the factory to start mass production. Our current plan is for them to “batch” the production run into shipments of somewhere between 1000 and 2000 keyboards spaced 3-4 weeks apart. That helps make sure that if we do have an issue early on, we can resolve it quickly and easily. It also works well with the delivery schedules for our keyswitches, LEDs and wooden enclosures. We’ll talk more about the schedule in the second installment.
PVT
We mentioned on Twitter that Jesse was headed to Shenzhen to oversee preparations for PVT. Quite reasonably, someone asked what PVT was. "Production Verification Test", also sometimes called the "pilot run" is when the factory makes a small part of your first production run using the final versions of parts on the assembly line.
In the software world, the closest analog would probably be the RC (release candidate).
The factory will make 100 Model 01s on the assembly line, using production parts. All the plastics come out of the injection molds. The PCBs are the final versions. The packaging is the final version, etc.
The idea is that it's the time when they work all the kinks out of the production system. They make sure their assembly and test procedures are right and then we check their work. We ship out those 100 units as fast as we can to test the boxes and our shipping and delivery infrastructure.
The actual PVT run should only take a day.
The factory does their own internal QC, but It'll probably take Jesse a few days to test all 100 of those keyboards.
As we go forward to Mass Production from there, we'll have professional test folks checking the factory's output. At first, they'll check 100% of the keyboards. If the defect rate is close enough to zero, they'll move to testing smaller and smaller percentages of keyboards until, hopefully, they're just pulling out a few random units to check that the factory's internal QC isn't asleep at the wheel.
When Jesse got on the plane for Shenzhen at the end of last month, the factory thought there was a good chance PVT would happen before he came home. We didn't really believe that, but it was a really nice fantasy to cling to for a few days.
IP Theft
It's fairly common advice that if you make something that customers want, your product is going to get cloned by somebody with... flexible ethics. We've long maintained that we're not too worried about the Model 01 getting copied by a "budget" manufacturer, as they're exceedingly unlikely to copy the aspects of the design that you (and we) value the most—put another way: a crappy $30 copy of the Model 01 would amuse us a lot more than scare us.
Well, shortly before Jesse left for China, we got email from a Beijing law firm telling us that a Chinese company had registered for the "Keyboardio" trademark in China and asking if we'd like to pay them to fight it. This had all the hallmarks of a scam, so we ran it by our friends at HWTrek. They told us that they'd checked with some lawyers they know in Shenzhen and confirmed that yes, indeed, somebody in China was trying to register our trademark.
There's a very specific scam that we think these folks were setting up. The way it works is that they register the trademark of a Western brand, hoping that nobody notices. Just as that company sends their first major shipment for export, the scammers ring up Chinese customs and tell them that there's a Western company infringing on their legitimate trademark. They ask the customs agents to impound the goods shipped by that Western company. At this point, the law is very much on the side of the scammers. But there's a simple, if costly, resolution. The scammers phone up the Western company and offer to sell them the trademark… for a moderately extortionary price.
Thankfully, this got caught early enough that we were able to file an opposition to the trademark filing. Our Chinese trademark lawyer tells us that the company who filed for our mark have also filed for over 100 other Western corporate brand names and that "the government really dislikes these guys."
To oppose a trademark in China, you need to put together a packet of documentation showing that you were using the mark earlier than the date claimed by the other guys. In this case, the scammers claimed a first use of March 2016. Our guess is that they found out about us from this article in March 2016: https://www.toutiao.com/i6263004569421218305/
The documentation packet we ended up submitting included these articles, as well as a number of English-language pieces, our Kickstarter campaign, US Tax filings and some invoices and receipts with the corporate name on them dating from before March 2016.
When you submit a trademark opposition in China, you need to file for the mark at the same time. In total, this is about three times as expensive as just filing for an uncontested mark.
Thankfully, the total costs in China are still incredibly reasonable. The whole experience, including legal fees and all filing costs, came out to about USD 680. The amount is small enough that paying cash ended up being a whole lot more efficient than doing a wire. Since the document signing was done late in the day, the accounting folks were out of the office and the initial "receipt" was confirmed by IM. It was, of course, followed up by a formal receipt and a number of very official looking stamped documents.
Paying lawyers in cash was definitely a new experience for us.
We've filed our paperwork during the opposition period, so the trademark won't be automatically issued. At this point, we don't expect to hear about a formal result from Beijing before Q1 2018.
Before writing about this, our lawyer confirmed that there was no danger to talking about it publicly.
Life lesson: If you're a hardware startup and manufacturing in China, file for your trademarks in China before somebody else does. Even if you think you’re too little to be a target. It's cheap and easy.
Keycap fit issues
One of the issues we've been going back and forth with the factory about is how tight the keycaps fit to the keyswitches. There's a balance here: Too loose and the keycaps come out when you don't want them to. Too tight and the keycaps take part of the keyswitches with them when you try to remove them. As of now, getting the keycaps right is the blocker for PVT.
Initially, the factory had recommended we go with their "regular standard." When we asked, they said that the keycaps should require approximately 1 kg of force to pull off the switch. That's a pretty normal number and we said we were fine with it. As the project moved forward, the factory revised their thinking. For a high-quality keyboard like ours, the keycaps should stay in a little better. They suggested that we switch to a 1.5 kg standard. We chatted with some friends who've made more of a study of keycaps than we have and, again, said we were cool with that.
As sample keycaps came back from the factory, we found that they seemed to be rather difficult to remove from a keyboard. We asked the factory to have the keycap removal force measured. After some back and forth, we got a somewhat fuzzy report that none of the keycaps required less than 1.5 kg of force to remove.
Pushing a little harder, the factory agreed to have formal tests run to see how much force the keycaps really took to remove.
In this report of keycap removal force, when they say “OK”, they really mean “Not OK”
The report came back, saying that no keycap required less than 2.2 kg to remove, with some needing up to 2.5 kg of force. That report, combined with our confirmation that we were able to destroy keyswitches just pulling off keycaps made it clear to the factory that they were going to have to press the keycap factory to resolve this issue.
When we sat down with the keycap factory, they initially proposed asking our keyswitch vendor to change the switch design and then suggested modifying every keyswitch to make the keycap fit a bit less tight. We explained that those solutions weren't going to work for us ;)
The solution, first designed by our factory's R&D Manager and later confirmed by the keycap factory is to round the corners of the keycap stems, removing just a little bit plastic. We agreed that we could accept anything that required between 1 kg and 1.5 kg of force to remove.
The solution, while 100% correct, does have one pretty serious complication. The keycaps are injection molded. To make an injection molded part larger, you cut away a bit of the steel from the injection mold. To make an injection molded part smaller, you have to add steel to the injection mold. In this case, the way you do that is to cut a "plug" out of the injection mold and replace it with a precisely-sized replacement plug that has a bit more steel.
We all agreed that before modifying the entire injection mold, the keycap factory should get things right on a single keycap first. Doing this for a single keycap is about a 1-2 day job. Doing it for 64 keycaps is about a 2-3 week job.
We finally went and bought our own force-gauge so we could verify keycap removal force. Here, you can see that the sample was much too easy to remove.
Before Jesse left China, he saw the keycap factory's first attempt, which took only 0.34 kg to remove.
The second attempt, which we didn't get to test was reported to be just shy of 1 kg of force. The night before he left China, Jesse saw their third attempt, which overshot slightly and took 1.6 kg to remove in our initial tests.
Last night, the factory said that the keycap supplier had delivered a sample keycap to them which requires 1.3Kg of force to remove. They’re happy with the result and have instructed the keycap vendor to modify the other 63 keycaps to match.
FCC/CE test lab
On the Friday before he left Shenzhen, Jesse visited the testing lab recommended by our manufacturer. These are the folks who will do the FCC and CE testing on the Model 01.
This is the antenna which will verify your Model 01 complies with Part 15b of the FCC rules
They also do reliability testing for a variety of products. We'll likely end up using a few of their test offerings, including the "constant temperature" (baking) machines, the UV testing machines, and the "salt fog" (corrosion testing) machines.
The corrosion testing machines are used, mainly, to verify that the PCB isn't going to to suffer catastrophic failure after spending 48 hours in a saline fog. We had to be clear with them that we know a wooden enclosure will not pass an intense corrosion test like this and that the results of the test on the enclosure would be informational only.
The 96 hour constant temperature test helps make sure that those of you in Arizona and Singapore aren't in for a colossal disappointment.
The intense 96 hour UV aging test makes sure that the coatings on the keycaps and the enclosure aren't going to start flaking off after a short period of time on your desk.
By far the coolest and scariest part of the test lab was their battery testing room. Some of their battery testing machines almost made us wish the Model 01 had a battery.
Sadly, the test lab wasn't willing to show us what happens when a product fails a test on this machine.
The current plan for FCC/CE testing is that our factory will work with the test lab to perform "pretesting" with hand-assembled prototypes. These tests are a tiny bit cheaper because the testing lab isn't certifying their results and nothing is being “officially” signed off. But they'll let us catch potential issues before it's too late.
Once we have PVT units assembled on the production line, a few will go to the test lab and start working their way through the formal test process.
We're still doing our diligence on proper labeling and shipping requirements for PVT keyboards we ship before the formal FCC Declaration of Conformity from the lab—we want to make sure your keyboards don't get held up by a zealous customs agent.
Screwdrivers
The orange screwdriver we like, along with some samples provided by another vendor
We mentioned in a previous update that the screwdrivers the factory had selected weren't sized correctly to open the keyboard. When Jesse got to China, we talked about it with the factory and they said that they had a few ideas for screwdrivers, but didn't have samples on hand yet. (While not our favorite answer, that's entirely reasonable. Screwdrivers are a commodity item with relatively short lead times.)
Since he was a little bit antsy, Jesse reached out to a few screwdriver suppliers from Alibaba directly. He contacted 8 suppliers at 11:30PM on Friday night. The first three suppliers got back to him in well under an hour. Two of the suppliers offered to customize samples with our logo and promised to deliver the samples locally before Thursday, the day we'd arbitrarily selected to make our final choice. The third supplier said they couldn't do a custom logo in less than a week, but that the sample would be free.
Sample fees are an easy way for vendors to help weed out folks who are just trying to get a single free copy of an item.
One vendor shipped us two laser-engraved orange screwdrivers for a sample fee of about $20. They arrived the following Monday.
Another shipped us five screwdrivers in a variety of colors, with samples of both Pad-printed logos and laser-engraved logos for a sample fee of about $20. They arrived on Thursday.
The third vendor shipped us a single screwdriver with another company's logo on it (as we'd agreed). The sample was free, but they didn't tell us that shipping would be COD until after the sample was on its way.
In the end, we liked orange sample the best.
Based on this, our factory say they want to try one more vendor. We're pretty happy with what we've got, but we'll have a look at their sample too.
Packaging
A preview of what your unboxing experience might look like
We've been talking to the factory about packaging for a long time. We had a detailed packaging spec in our original RFQ (request for quotation).
The first packaging supplier the factory brought in were… not great at meeting their self-imposed deadlines. They got us a first sample, but didn't really deliver a proposal. We showed some photographs of this sample months ago. Eventually, they failed to deliver promised updates one-too-many times.
While in China, Jesse worked with two packaging suppliers introduced by the factory and one supplier introduced by a friend. The experiences couldn't have been more different.
The supplier introduced by a friend is… very high end. We tried to get them to spec two versions of the packaging—one a "cheap, but strong" box and the other showing off what they're good at. Their inexpensive offering was really nice, but was an eye-popping $15.
Their nice offering? It was gorgeous. The slide-out drawer for the keyboard's accessories had a silk ribbon. Describing it as out of our price range does a disservice to the word "understatement."
We didn't get a great vibe from the first packaging supplier introduced by the factory. They hadn't really prepared for the meeting. We spent the better part of an hour talking about what kind of foam might make sense to use inside the box and getting a quick tour of their foam-cutting operation. Supposedly, they also do cardboard boxes, but at another facility. They don't do printing, which we need for things like the manual and layout card. They promised to build up a sample, but we never saw it.
The second packaging supplier came to us for a first meeting before we visited them for the second meeting. At that first meeting, they brought an initial design for the cardboard box and the foam inserts. We talked through changes we wanted, as well as what we wanted for the keyboard's manual and layout card. When Jesse asked what format they wanted the layout card and manual in, they asked for Adobe Illustrator (CS5). They actually asked about typefaces.
For the second meeting, we visited their factory in Dongguan. They'd made a second sample box incorporating most of the changes we'd talked about. They'd done a first mockup of the manual, cut in the shape of the keyboard. It was about 3cm x 5cm. The text was a little bit too small to read. We talked about it and Jesse explained that we're not including the manual just because we have to—we actually want people to read the manual.
The sample of the layout card wasn't quite right. We'd asked for something "laminated" and the first few things they came back with were plastic-coated, but still pretty easy to fold or tear in half. Eventually, we showed samples of restaurant menus. That got the idea across and before Jesse left China, the packaging factory delivered samples that were exactly what we'd been looking for.
Simon-Claudius Wystrach (@thebaronhimself) is responsible for the layout card actually looking pretty. We based the style on a template designed by Arley McBlain (@arleym)
Two years ago, we'd estimated the Model 01's shipping weight at 5 pounds. We've used that estimate as part of all of our shipping calculations. We thought that number was relatively safe. But we never really knew. When we put the fully-loaded package on the scale in the packaging supplier's conference room, it came out at 2.21Kg. That's 4.87 pounds. That was a really happy moment, though we don't think the factory or the packaging supplier understood why.
Before we left China, we saw two more revisions of the packaging, with further refinements. We were a little annoyed to see that the text on the back of the box at one point read "Design in Oakland, California" rather than "Designed in Oakland, California"… and more than a little embarrassed to realize that the issue was that they'd faithfully reproduced a typo Jesse made.
One of the last things to change was that the supplier rotated the orientation of the corrugation of the cardboard 90 degrees to help make sure that the little locking tab doesn't fall apart as easily. It’s a tiny detail, but it’ll make the packaging just a little bit nicer.
But wait, there's more!
That’s it for today, but watch for part two of this month’s update sometime next week. Things we’re planning to talk about in that post include: Long leadtime components, keycap painting and engraving, the new baseplates (which look great), the stands, the rails and center bars, the firmware, and a few other tidbits.
<3 j+k
Day 590: Two steps forward, one step back.
about 9 years ago
– Sat, Feb 18, 2017 at 10:16:20 AM
TL;DR: The PVT run didn't happen before Chinese New Year; Our factory fired an underperforming supplier; We've approved the final versions of some parts.
Hello from Oakland,
We've made a bunch of progress over the past month, but we're behind where we hoped to be.
The major issues right now are the keyboard baseplates, availability of the APA 102C LEDs we're using, and Chinese New Year.
Like we did last month, we've structured this update as a "part by part" update, roughly paralleling Jesse's nightly calls with the factory in China.
Wooden enclosures
The factory sent "golden sample" wooden enclosures in their most recent delivery. The changes since the previous sample were primarily in how tightly they fit the baseplates. Up until this set of samples, every single enclosure had fit the baseplates so tightly you needed to apply force to get them to mate. Because wood can shrink or expand a bit depending on weather and temperature, this meant there was a chance that the size of the baseplates could force the enclosure to crack as it contracted.
Last time around, the wood milling shop tried adding an extra 0.2mm gap between the edge of the enclosure. After that proved to be insufficient, we asked them to take another stab at it. This time, the samples showed up with a full millimeter gap between the baseplates and the enclosure. Assembly didn't require any pushing or twisting, and the baseplates and enclosure mate beautifully.
Top: the new, looser fitting enclosure. Bottom: the old enclosure that was too tight.
We signed off on the enclosure samples and asked the factory to place the PVT (pilot run) order. We expect it to be delivered a couple weeks after the end of Chinese New Year.
As we understand it, the wood milling factory has also obtained and started drying the wood for the mass production run.
Plastic baseplates
The plastic baseplates weren't supposed to be difficult. They're pretty standard injection-molded parts.
You might remember an update last year where we talked about the factory trying to speed up the production process by starting the tooling process before we'd signed off on the baseplate design. The sample baseplates that came back from that tooling were riddled with small issues. Some of the problems were "normal" problems you'd expect to see for the first samples out of a "T0" injection mold. Bits were sunken or warped. The surfaces had blemishes. The parts were a little bit warped. The plastic was too thin in places. Some of the issues were more serious. Internal support structures didn't quite connect as they were supposed to. Features were missing.
We went back and forth with the factory as we updated the baseplate design to remove the ill-fated flip-out feet. That took...a lot longer than it should have. The factory was working to minimize the cost of tooling changes and didn't believe us about a couple of the structural issues we were worried about.
Finally, sometime in November or so, the subcontractor making the baseplates started in on the tooling changes. They blew their first (self-imposed) deadline. And their second (externally imposed) deadline. And then they delivered sample baseplates that were comically bad. Structural supports didn't line up with each other. Places where they'd added extra plastic to reinforce a circular structure were offset from the plastic they were supposed to be matched to. Half of the changes to the right hand baseplate...simply weren't made.
Over the course of the next month, the subcontractor doing the baseplates modified the tooling at least 3 more times in an ultimately futile attempt to deliver usable samples. Sometime around the first week of January, our factory told the baseplate supplier that they had one more chance to make everything right or they were getting fired. The manager of the subcontractor promised to deliver perfect samples on that Friday. And then on Saturday. And then on Monday. The samples showed up on Tuesday or Wednesday. That night, the factory told us that they were going to fire the baseplate supplier and had already started getting quotations from new suppliers.
The final samples from the subcontractor were...closer to what we'd specified, but were still bad enough that the factory thought they were never going to be workable. Our factory had a strong incentive to make this supplier work out--they ended up out of pocket for the deposit paid on the defective tooling.
Our factory ended up sharing three competing bids for the baseplate tooling with us the week before China shut down for the Chinese New Year holiday. The pricing for all three options was within about 10% of each other (and the original quotation). They also all shared the same disappointing tooling lead time: March 15-20.
While disappointing, an 8 week lead time for steel tooling isn't entirely crazy. It's actually pretty normal. And with Chinese New Year eating up 40% of that time, it's nearly miraculous.
We asked for, but never received, information about the three suppliers’ capabilities that might help us with the decision. Ultimately, we didn't push too hard on that because there wasn't a whole lot we'd be able to do with it.
Our salesperson promised to push on all three vendors to reduce the cost of the tooling and to try to cut down the lead time. We told her that while we'd be happy to see a cost reduction, we'd be happier to pay the full price or even a little extra if they could reduce the lead time. Two of the vendors said there was no wiggle room on the lead time. The third said they could deliver it earlier, during the week of March 5. The factory recommended we choose that supplier. We smiled and nodded and ran with their selection.
Rubber feet
One of the things we received in the most recent sample package from the factory was an updated set of rubber feet samples for the baseplates.
Our rubber feet are simple compression-molded silicone feet. And they're custom-made for the Model 01. Since they're custom made, one of the things we have to choose is the adhesive we use to stick them to the bottom of the enclosure. The samples we got the last time Jesse was in China just didn't stick very well. Even though we've designed the baseplate to help protect against the rubber feet shearing off, they still came off far too easily.
We asked for a few samples with different adhesives. The factory's rubber feet supplier provided three options, two of which we rejected since they didn't actually stick all that well. The third option, 3M's "200MP" adhesive, does a great job of holding the rubber feet onto the baseplates.
With that selection of the adhesive, we've signed off on the rubber feet for the enclosure for PVT.
Sliding dovetail center bars
The center bars are looking prettier, but the injection molds still need some fine-tuning to make sure the parts don't come out warped.
Each Model 01 will ship with two bars you can use to attach the two halves of the keyboard to each other. One is flat and the other offers a 7.5 degree tent. To make sure they're sturdy and that they won't crack, the center bars are made of glass-filled nylon. In our torture testing last year, we found that the glass-filled nylon has just enough give that it will let you snap the keyboard apart before the bar breaks. (We do not recommend testing this.)
Over the past couple months, the factory has modified the tooling for the tented center bar to remove the old flip-out feet and has updated the bottom sides of both bars to add a Keyboardio logo and a subtle texture, similar to what you'd find on the plastic of a thinkpad.
(When you're injection-molding plastic, you can choose to make the plastic shiny or to have a texture. Shiny plastic can look nice, but it shows abrasion and wear pretty easily. It's also much more time-consuming to create the molds for--to make shiny plastic, injection molds have to be hand-polished to a mirror finish and to be touched up regularly.)
Even before they sent the box, the factory warned us that the sample center bars we'd receive just before Chinese New Year had a problem. Unlike previous versions, they were badly warped. This is probably due to incorrect settings on the injection molding machines or insufficient cooling before the parts come out of the mold. The shop boss at the factory apologized that he wasn't able to correct the issue before Chinese New Year and promised to tackle it after they get back from the break.
Rails for the bottom of the baseplates
The center bars slide onto two rails that screw onto the bottom of each baseplate. To help you connect the center bars, each rail has an arrow indicating how to attach the center bar. In previous versions, the arrows were backwards. The samples we got just before Chinese New Year were finally correct.
The one issue we ran into with the rails was that the smaller of the two rails is just a little bit too narrow to lock snugly in place with the center bars. We sent the factory a video and they'll be tackling this by tweaking the center bar, rather than the rails.
Plastic stands
In the most recent box of samples, the factory provided an updated sample plastic stand. This version fully resolved all of the issues we had with the stand bending or flexing. The only known issue with this design is that the hole for the tripod screw is a little bit too big, leading to the stand sliding around a bit more than we'd like during assembly.
The factory duplicated the sliding-around issue and modified the size of the hole in the drawings, after which we signed off on the design of the plastic stands. The stand tooling should be ready before the baseplate tooling.
Rubber feet for the plastic stands
The most recent samples of the rubber feet for the plastic stands are die-cut silicone. We found them to be a bit slippery on a desk. We've asked the factory to provide us with another option that has a bit more texture. They were to have included it with the last set of samples, but the contractor doing the rubber stamping closed for the holiday before delivering them.
Screw for the plastic stands
The factory has sent us a variety of tripod screws to mount the stands to the baseplates. Most of the options were a steel screw with a molded plastic handle. After a bit of initial confusion, they even fit in the baseplate.
All of the plastic-handled screws felt cheap and we ended up rejecting them. Finally, the factory managed to source a black-anodized unibody metal screw that's reasonably grippy and compact enough to fit where we need it to.
For a while, it looked like we were going to have to fabricate custom tripod screws. Jesse specced out our "ideal screw" and got a half-dozen bids, before the factory found a screw that looks workable. We're pretty sure we're set, but if we're not, we've now got a bunch of other options.
Wooden stands
We're expecting the "golden sample" of the wooden stands to show up in a final pre-Chinese New Year package tomorrow. The factory has warned us that some of the wood may be thin enough that there's a chipping issue. At this point, it looks like we might not need to use them for PVT. We may end up selling them as an aftermarket option later if they meet our quality standards.
Metal keyplates
The metal keyplates were finished in November. The stamping factory needs about a week's lead time to churn out thousands of them.
Keycaps
The factory sent us samples of unpainted and laser-engraved keycaps in the last package of samples. They've fixed some small structural issues with the insides of the keycaps, primarily related to the shapes of the keystems. We haven't yet done a key-by-key evaluation to sign off on the plastics, but should be doing that while the factory is on break.
This month, the factory finally delivered a formal report on the force required to remove each keycap. It ranges from 2 to 2.5 kilograms of force per key. That's enough force that your keycaps shouldn't be falling out, but is a little bit higher than they'd initially promised. The factory still owes us a report on how many times keycaps can be removed and put back in without damaging any of the keyswitches. We've explained to them that it's important that customers be able to swap out their keycaps without destroying their keyboards.
The keycap factory has managed to make the plastic a little bit more translucent. Ideally, we'd like it a little bit clearer, but the current coloring is definitely workable.
Keycap laser engraving has been a bit of a saga. The laser-engraving factory has screwed up in a variety of ways, ranging from swapping the left and right hand key labels to modifying the text on the keycaps. Thankfully, the actual quality of the laser engraving seems fine.
The laser company will take another shot at it when they reopen after the holiday, but we suspect that the only way we're going to figure out what's going wrong is to have Jesse visit them in person and get them to agree to let us set up the engraving templates ourselves.
RJ45 connectors
We've mentioned in previous backer updates that the factory had pushed us toward local versions of some components. In some simple cases, that's fine. In others, it's less fine. In pretty much every case, we were willing to try their versions. Generally, the reasons they were pushing the local versions of things related to availability. Some of the components we specified were hard for them to find in China.
One of those components was the Taiwan-made RJ45 connector for the inter-hand cable. The local version was...almost the same. It was just different enough that it wouldn't fit comfortably on the PCB. And the plastic was...almost as sturdy.
In the end, we found that the locally made RJ45 connectors were just a bit too fragile, so we introduced the factory to the salesperson from the original factory in Taiwan and they've placed the orders for PVT and mass production.
The change in RJ45 connectors meant that we ended up having to slightly update the PCB design. More on that below.
LEDs
Despite the vendor's best efforts, the folks who make the SK9822 can't figure out why our design is quiet with genuine APA 102C LEDs and makes a ton of acoustic noise with their "SK9822" clone.
The best they've been able to offer is that the quality of power delivered over USB isn't good enough for them and that we can mitigate the problem by adding a _lot_ of extra capacitance to our board in a way that we're pretty certain would make it badly non-compliant with the USB spec. They did end up delivering a custom spin of their LEDs with an additional patch wire inside the package. It took them about a week to deliver a few hundred samples, as they promised. Sadly, it didn't help. They've taken sample boards to the company that designed the IC inside the LEDs, but we're not holding our breath.
At the same time, we've been working with APA in Taiwan, who make the LEDs we originally specified. As we mentioned in a previous update, they're pretty heavily backordered.
Last week, they told us that they'd managed to shake loose enough stock for the first nine hundred keyboards and could deliver them immediately after Chinese New Year if we placed the order immediately. We instructed the factory to place the order and they did so. We're supposed to get a confirmation of the lead time for the remainder of the LED order late this week, but we expect it to be sometime in late March. This is less than ideal, but is likely to fit nicely with the baseplate tooling timeline.
USB Type C Connectors
Since the Type C connector is going to see more abuse than most other parts of your keyboard, it's really important to us that it be something that's expected to take a beating.
We originally specified USB Type C connectors from JAE, a respected Japanese brand. The factory had a lot of trouble sourcing them and pushed local connectors at us pretty hard. Unfortunately, none of the local connectors they showed us came with...the names of the factories making them or test reports proving that they could live up to the 10,000 plug/unplug cycles they're supposed to support, we ended up rejecting them.
Finally, we asked the factory to just call JAE in Hong Kong and find a reseller who could do business with them. The first attempt at that ended up with a quotation of "we might have enough stock" and a price roughly 2-3 times the cost of buying the connectors retail in the US. For a while, it looked like the easiest solution was going to be ordering reels of USB connectors from DigiKey, sticking them in a suitcase and flying to China. Thankfully, a second round of discussions with JAE in Hong Kong shook loose a reseller with stock on hand and a less extortionary price.
The reseller has now put a hold on the inventory we'll need for mass production and the factory will send a purchase order just after the holiday.
Keyswitches
The factory already has the Matias keyswitches for PVT in stock. We're in the process of working with Matias in Canada to make sure that the switches for mass production are ready for us when we need them.
PCB design
Because we needed to modify the PCB to fit the RJ45 connector, we took the opportunity to clean up a few small issues around the placement of the programming connectors inside the case.
The factory's regular PCB fabrication house quoted an absurdly long lead-time for sample boards. Apparently, they really don't like doing prototype boards and only do them for our factory as a favor. Seeed and DirtyPCBs are our usual go-tos for prototype PCBs in a hurry. Sadly, while both companies are located in Shenzhen, they're both set up to ship boards out of China...exclusively.
We ended up asking some Shenzhen-based friends for a recommendation of a quick-turn PCB shop that can deliver domestically in China. They recommended HQPCB and SZ-JLC as two fast, cheap options. HQPCB is convenient because the entire ordering flow is done over the web. SZ-JLC, we're told, prefer to call you to talk about your order.
We provided both options to our factory, along with some pricing guidance. We told them that we expected that 10 pieces of the left board and 10 pieces of the right board could be delivered within 24 hours for a total cost of about $160. We told the factory that as long as they placed the order and the cost was under $220, we'd be happy to cover the cost. In the end, the boards cost $175. The whole thing almost fell apart because someone in the factory's purchasing department saw that the total price was 10% over our initial estimate and they tried to stop the order from being placed. Thankfully, our salesperson overruled that decision.
Last week, the factory assembled sample PCBs and we should have them in hand tomorrow afternoon for testing.
RJ45 Cables
Two vendors have promised the factory sample RJ45 cables. Both were to deliver the week before Chinese New Year. Neither did. Thankfully, RJ45 cables are easy to source, even in custom colors and lengths.
USB Type C Cables
A look inside two USB Type C cables. Left: the nicer looking, but inferior cable. Right: the higher quality cable.
The factory sent us two sample USB Type C cables. As it turns out, both were from vendors Jesse found during a previous trip to Shenzhen and introduced to the factory. The vendors the factory had approached on their own had asked for money to make tooling for the cable in advance of providing samples.
One of the cables was more attractive looking, with a pretty rounded molded Type C connector and connectors that look as if they might be gold-plated. This is a cable we first bought off-the shelf in the markets. The other cable was...blocky. It was custom made for us.
Both cables worked fine and we were leaning toward the pretty-looking cable, until we got to the destructive testing phase.
When we cut open the pretty cable, we found that it was just a four-connector USB 2.0 cable...and that it wasn't particularly well structured inside. On top of that, its electronics were wrong. The USB Type C specification makes a big deal out of how a cable is supposed to signal that it's not set up for 3A fast-charging with a 56k resistor. The resistor inside the pretty-looking cable was...10k, which wasn't what we were looking for.
The blocky-looking cable was provided by a vendor Jesse had met in Hua Qiang Bei, the electronics market in central Shenzhen. When he first asked this vendor if he had a 1.5M USB A to right-angle USB Type C cable, the vendor whipped out a notepad and started sketching what he thought we meant. It took about 5 minutes to explain what we wanted. The vendor ended up calling up a bilingual friend to help make sure he understood. He asked for a business card and said he'd send us email when they'd made a sample.
Lo and behold, a week later we got pictures of a sample cable. The price was reasonable and the leadtime for 5000 pieces was about 3 weeks. We asked about the internal structure of the cable and got pictures of the sample cable cut open.
When we got the sample from our factory, we cut it open and were happy to discover an actual USB 3.1 cable with reinforced shielding. When we tested the resistor, we were happy to discover it was a nice spec-compliant 56k.
We'll be having the factory contact the second vendor after the holiday to start to figure out production.
Packaging
The factory has been working with a packaging design company. They'd owed us a complete initial proposal the week before Chinese New Year, but weren't able to deliver. They say we're the top priority once they're back in the office after the holiday.
Once we agree on a design, the lead time for custom boxes is about two weeks.
Screwdriver
The screwdrivers have a nice butterfly logo, even if they aren't yet the right size to be able to dismantle your Model 01.
The factory sent us samples of the screwdriver they'd sourced. The butterfly logo looked good. There was only one small problem. While the screwdriver was able to open the keyboard enclosure, it was the wrong size to be able to handle the Model 01's interior screws. This issue is, of course, easy to fix. After the holiday, the factory will reach out to the screwdriver supplier to get something with the right size Philips head.
Schedule
It's now the beginning of the Chinese New Year holiday in China and most suppliers are already closed until sometime around Feb 10. At that point, staff will start returning to work as they return to Shenzhen from their hometowns. This is typically the time of year when there's a lot of employee turnover, leading to factories needing to staff back up as they get up to full speed.
Jesse's planning to head to Shenzhen for the first two weeks of March, with a goal of supervising the PVT run we had thought was going to have happened this month. As you might imagine, the delay is intensely frustrating to us, though less frustrating than shipping a shoddy product.
Next update
The Model 01's firmware has seen a bunch of work over the past few weeks. Since we don't expect to have much to report on the hardware front due to the holiday in China, we're planning to talk about that in next month's update. We, did, however want to share a quick work-in-progress video of an LED effect @algernoone is working on for your keyboard:
Day 560: Year-end update
about 9 years ago
– Wed, Jan 18, 2017 at 03:26:10 PM
Hello from Oakland,
First up, please accept our apologies for the tardiness of this month's backer update. We welcomed our son Ira Aaron Vincent into the family on December 3 and the last few weeks have been happy, but somewhat sleep deprived. If this update is a bit shorter or less coherent than you've come to expect, this is the guy you can blame:
Ira Aaron Vincent was born December 3, 2016 at 10:10 PM
While we haven't been getting a whole lot done in Oakland, our factory has been hard at work marshaling the resources for our PVT (production test) run and for mass production. This hasn't gone as quickly as we'd have liked, but we've been making steady progress.
Schedule
Last week, the factory sent us updated samples of the wooden enclosure, the baseplate, the center bars, the rails, the rubber feet, the screw for the stand, and the Type C cables. We’re eagerly awaiting the package, which DHL says should arrive on Tuesday. The final samples of the keycaps they were supposed to send came back from the painting shop and were judged to not be of good enough quality to send along. The factory has said we should expect them this weekend along with the final sample of the plastic stand.
Right now, the longest lead time components are the wooden enclosures, name-brand RJ45 jacks and name-brand LEDs. We're starting to run up against Chinese New Year, when all manufacturing and commerce in China shuts down for about 3 weeks. Factories will start to close on or about January 15.
Our wood supplier has told us that if we place the production order within the next few days, they can promise 500-600 sets of keyboard enclosures before they close up shop for the holidays. As of now, this is the limiting factor on how many keyboards we expect to be able to produce in January. As soon as the "golden sample" arrives, we'll check it to make sure they've fixed the problems in the last version and ask them to spin up the CNCs.
The factory thinks they'll be able to ship the first 500 production units before Chinese New Year, but we're pretty sure that's not actually plausible. Once folks are back at work in early February, Jesse will be back in Shenzhen to do everything possible to push things forward.
A small gift for you
There's no way we can express how much it's meant to us that you all have been so supportive as we've worked our way through the design and manufacturing process, but we wanted to do _something_ to say "thank you"
When we launched the Kickstarter campaign, we told you that we'd be offering you a choice of keycap labels. Many of you have asked about the cost of additional sets of keycaps. I think we've previously said that we expect that extra keysets will cost about $40.
Every keyboard ordered before December 31, 2016 will come with a set of QWERTY keycaps preinstalled, as well as a second set of keycaps for free. As of now, it looks like you'll be able to choose between (at least) QWERTY, Dvorak, Colemak, Runes and a blank variant.
We know that extra keycaps don't in any way make up for how long it's taken to get your Model 01's made, but we hope that you'll enjoy them.
A team of folks from the community has been hard at work on our non-QWERTY key layouts. We're thrilled and amazed by what they've come up with so far.
Michael Richters is primarily responsible for the Linear A "runic" layout. He has a few more changes to make before it's set in stone.
Here's the status of each part:
Wooden Enclosure
Over the past month, we've been working with our factory and the wood CNC factory to finalize the dimensions of the Model 01's wooden enclosure. What we'd found on the previous samples was that while the wood was perfectly sized coming off of the CNC, it managed to shrink by a fraction of a millimeter before it was finished. As it turns out, this was just enough that plastic base plates were hard to fit into the wood, and, once installed, tended to push against the wood. In at least one case, this caused the wooden enclosure to crack.
Once we brought this to the CNC factory's attention, they made a small change to the enclosure's dimensions and milled a new set of samples. Our factory tested them over the course of a week, pronounced them to still fit well after sitting in the humid Shenzhen air and sent a set of samples onward to us on Tuesday. Once we verify that they _still_ fit well after their international flight and a few days in the unseasonably cold and dry California air, we'll ask the factory to start cranking out the wooden enclosures for PVT.
They've guaranteed that they can finish the PVT enclosures within two weeks and said that they should be able to do another 500. We'll see.
Base plates
After a fair bit of back and forth, the injection molding factory making the keyboard's baseplates finally completed what was supposed to be the final modification of the tooling before PVT last Friday. This change removes the pockets for the old feet and adds extra internal "ribbing" to help the base plates stay rigid. It also slightly modifies the tooling to use a mixture of ABS and Polycarbonate, again to give the baseplates more strength.
Samples of the updated design are in a package on their way to us now. Our factory has told us, however, that they're upset with the contract factory who's doing this work and that the quality of the parts coming out of the updated tooling isn't yet usable. They expect that the next version of the tooling will take another week and are meeting with the management team at the injection molding factory to try to press them to get their act together. Our factory says they're planning to send their mechanical engineer to babysit the injection molding factory while they update the tooling.
Metal keyplates
The tooling for the metal keyplates has been done for quite a while now. Once we're ready to make everything else, the metal stamping factory can churn thousands of them out in about a week.
Center bars
The tooling for the updated versions of the center bars that you can use to keep the two halves of your Model 01 together were finished about a week ago and samples are on their way to us now. There are still some issues with the bottom surface of those parts and the factory is working to make slight changes to the tooling to resolve them. These parts, at least, are being made in-house by our factory, so the turn-around time is expected to be quick.
The surface treatment on the updated center bars isn't quite up to snuff yet, but the factory is on it.
Rails
The rails that hold the center bar to each half of the keyboard have been updated to include built-in brass nuts. The factory has sent us samples for final approval.
The production rails will be black, but these updated samples are the first to have embedded brass screws.
Stands
Earlier this month, the factory sent us CNC-milled samples of the wooden and plastic versions of the new "starfish" stand. We found that the bottom side of the plastic stand had just a little bit too much give to it. The factory made a slight tweak to the design to fix this and had a new sample made. That sample should be done tomorrow. At the same time, they've put the stands out to bid at three injection molding factories and found one who are promising a 3 week leadtime for tooling.
The first version of the rubber feet that the factory put on the stands weren't grippy enough, so they're sending over a new version with a bit more texture to them.
This is still a little bit too long for PVT, so the folks who are doing our wooden enclosures put together a sample of a wooden version of the stand. It's going to be fairly expensive to make, but we can do a small run of them with a very short lead time. The current plan is to use the wooden stands for the 100 PVT units and then to (hopefully) make them available for sale later.
You can see samples of the wooden and plastic stands in the foreground of this photo
Keycaps
At this point, we think that the keycap molds are all set, though we're still waiting on a report from the factory confirming how much force is required to insert and remove the keycaps. This will help us make sure that the keycaps are easy to assemble and easy to replace, but won't fall out when you don't want them to.
We'd expected a sample of the production version of the labeled QWERTY keycaps to show up this week, but when the factory got them back from the painting shop, they found that the quality of the painting wasn't up to snuff. It turns out that the jigs they use to paint the keycaps need a small modification to let the paint cover the bottom edges of the keycaps. For the PVT run, the factory has developed a hack to work around this. At the same time, they're modifying the jigs for mass production.
This photo from the factory shows the painting problem they're working to rectify.
Stand screws
The stands screw to the bottom of the keyboard with standard 1/4-20" tripod screws. Our factory has had some trouble sourcing the right screws. Over the past few weeks, they've sent us samples that had screw threads that were just wrong enough to be a problem, as well as samples that were fairly cheaply made, with the handle just not very well attached to the screw. This week, they showed us photographs of a much nicer looking all-metal tripod screw. Samples of this new screw are winging their way to us now.
Packaging
The factory's packaging supplier has sent them sample of a packaging design, but we've been told that it's "way too big" and they're taking another stab at it.
USB Cables
Earlier this month, the factory sent us samples of a proper 1.5M USB cable with a right-angle USB-C connector on the other end. We asked them to find us a second source so that we could compare the quality (and verify that one or both of them have the correct embedded resistor to meet the USB Type C spec).
The second sample should arrive on Saturday or Monday. After that, we can select one cable and the factory can place the order.
RJ45 Cables
The two halves of the Model 01 are connected by an RJ45 cable. We'll be shipping your Model 01 with a short cable and a long cable. The factory showed us first samples of these four months ago. We're expecting them to send the final samples for approval next week.
RJ45 Connectors
Each half of the Model 01 has an RJ45 jack to plug that cable into. Originally, we were using a Taiwanese jack, but our factory told us that the lead times were just too long and recommended a locally made version to try instead. Well, we tried it. And this month, one of those jacks cracked in a way we didn't like after far less abuse than it should have taken, so we told the factory they needed to switch back to the part we'd originally specified. They sent samples of the newly-sourced original part for us to verify. After that, we'll make a tiny change to the circuit board design so the new/old jack fits correctly and then crank out the PCBs for PVT.
LEDs
We've been continuing to track the acoustic noise problem with the LEDs that we've mentioned in previous backer updates. You might remember that we'd found a partial solution that involved swapping out some inductors and capacitors. We worked on tuning that solution and while it managed to cut down the noise, it wasn't perfect and came at the cost of some components that would be more prone to failure.
We'd been pretty sure the problem was a PCB layout issue, but it turned out to have been caused by the specific LEDs the factory had sourced for the Model 01. Because the APA102C LEDs we'd originally specced had a long lead time, the factory had found a few locally made alternative LEDs that were supposed to be 100% compatible. As it happens, they're compatible, just not exactly the same. And in our use case, they whine.
We reached out to APA, the original manufacturer to see what they could do for us. They were able to ship enough LEDs for the PVT run immediately, but have told us that we're looking at a 12+ week lead time for volume delivery of APA102C LEDs. They offered us two other new options, the 102-2C and the 102-22C. We got the 102-2C LEDs. After discovering that they also had the noise problem, we took a look at the chip inside them and discovered that they appear to be the same not-quite-compatible clones, rebadged and resold by APA. the APA 102-22C are in the mail to us now and we expect them next week. We're hopeful that they'll play nicer.
At the same time, we got some samples of the SK9822, another APA102C clone, directly from the manufacturer. They too turned out to use a version of the chip from the bad clones. We asked the manufacturer about the problem and after a bit of back and forth, they admitted to knowing what was going on and offered to spin us some new LEDs that trade a slightly higher power usage for being dead silent. It took a week and a half, rather than the week they promised, but those LEDs got put in the mail to us on Friday.
Next week, we hope to put the APA 102-22C LEDs and the v2 SK9822 LEDs through their paces. If neither of them works out, we're going to start trying to find stocks of APA 102C gathering dust on distributor shelves and rope in a couple of EEs to look at other ways of quieting down the clone LEDs.
This is, of course, all incredibly frustrating and is something that should have been figured out months ago, but we're happy that we've found the actual cause of the issue rather than shipped with the band-aid we'd been trying.
Next update
You should expect to hear from us again when we're ready to ship the PVT keyboards to customers willing to take the earliest units and put them through their paces OR when our factory shuts down for the Chinese New Year festival, whichever comes first.
Thanks again for sticking with us. As much as this update is a laundry list of open issues, we believe it to be a nearly complete list of the open issues we need to resolve before we ship your keyboard to you.
<3 i+j+k
Day 518: Inching toward mass production
about 9 years ago
– Tue, Jan 17, 2017 at 09:44:57 PM
TL;DR: Updated stand design; making progress on firmware; resolving issues with injection molded parts; PVT looking like December, with mass production to follow.
Hello from Oakland!
Electrical Engineering
When we last wrote, we told you about a buzzing issue we'd been tracking in our Chinese-made PCBs. We got some help from Seeed on a proposed fix that dramatically reduced, but did not eliminate the buzzing. As we tested Seeed's fix, we discovered that it also caused a heat issue when the boards were run with the LEDs turned up to a higher brightness.
After a couple weeks of the factory's EE being unable to find the source of the problem, we begged a favor from Input Club's Jacob Alexander. The heat problem turned out to be pretty simple. The inductors Seeed had picked max out at 1A of current, while we let you configure the LEDs to draw a bit over 1.5A.
Additionally, as we've been putting our test boards through some stress testing here in Oakland, we found that the RJ45 and USB Type C connectors the factory's suppliers had recommended in place of the foreign brands we'd originally specified weren't hitting the reliability levels we wanted. One of the RJ45 connectors had a bit of its plastic crack, stopping the interconnect cable from locking in place. The USB Type C connector started off doing a really good job holding a cable in place. After a few weeks of frequent cable insertions and removals, it just wasn't as "grabby" as it had been when starting off. It still works fine, but we're concerned that it might not have the longevity we want. The factory is working with their suppliers to source higher quality parts in both cases. Thankfully, neither part will require a PCB change. We've been atypically rough on these test boards to try to make sure that your keyboard will be sturdy and reliable. It's probably the case that the existing parts would have been fine, but since we're still waiting on some of the mechanical updates, we have the opportunity to do better.
The factory's brought in outside EE resources to help them finish triage and tune the inductor and capacitor selections. The delay has been frustrating, but we hope to have that resolved this week. They'll send us a set of boards for final testing. Once we give the thumbs up, they'll be locked down for production.
We also had an interesting moment when the factory notified us that the keyswitches they'd received for our PVT (production validation test) run had been recalled due to a defect. Thankfully, upgraded replacement switches were delivered on October 25.
Firmware
A lot's happened on the firmware front in the past month.
As we've mentioned before, we're using an ATMega32U4 microcontroller as the Model 01's 'brain' and using a pair of ATTiny88 microcontrollers as the keyscanners & LED controllers.
For "day to day" reprogramming, reprogramming the Model 01 is pretty straight forward: just hold down the "Prog" key while using Arduino, avrdude, or another firmware flashing tool. This is what you’d use to update the keyboard’s firmware, change key layouts, or customize the LED effects.
If you want to do really crazy things with key debouncing, you might have to reprogram the ATTiny88s. One of the things that's worried us is that while the 32U4 is easy to reprogram over USB, the ATTiny88s are buried inside the keyboard. We're including standard ICSP headers so that you're able to reflash the bootloader on the ATmega32U4 or either ATTiny88 by unscrewing the keyboard's enclosure.
We're happy to report that we now have a tested solution for reprogramming the ATTiny88s without using a screwdriver or an external programmer. With help from our friend Chris Swenson, we modernized (and significantly overhauled) the I2C bootloader for ATTiny microcontrollers Atmel released in an ancient tech-note. You can now use your Model 01's ATmega32U4 to program the ATTiny88s using a custom firmware program.
Now that we've built this functionality, we're hopeful that you'll never, ever need it. But if we do need to update the ATTiny88 firmware on your Model 01, it will now be mildly irksome, rather than a frustrating process that requires detailed instructions and additional hardware.
On the keyboard firmware front, a lot's happened. Last month, we mentioned that Gergely Nagy had started building a custom feature for the Model 01 he didn't have yet. Since then, he built an entire custom firmware for the Model 01 that he still doesn't have, submitting patches to our libraries as we went. As we talked on IRC, we somehow suckered him into adding a couple neat extension mechanisms to the core Model 01 firmware and rebuilding the features he'd built as plugins. You can follow along here: https://github.com/algernon/Akela
You're also welcome to join us on #keyboardio on Freenode IRC.
At the same time, we've been working to streamline the core firmware and to add the factory test mode we mentioned in the last backer update.
Stand design
When we last wrote, we showed some work-in-progress pictures of the new stands which will let you customize the tent and tilt angles of the Model 01. The stands screw into the standard 1/4-20 tripod mounts on the bottom side of each half of the keyboard.
The versions of the stands we showed were works in progress, CNC milled out of blocks of yellow ABS plastic. To try to give you an idea of what the stands might look like, we shot photographs of the keyboard at an angle designed to show the stands off. That...might not have been the best idea. A number of you were concerned that the stands would look big and ugly and blocky. That's very much not what we want.
After the last backer update, we kept iterating on the design and have ended up with something we think looks a lot nicer, is more portable and is a bit more stable. Please keep in mind that the production version of the new stand will be black or off-black, not white.
This is what the new stand looks like. Keep in mind that this one was poorly CNC milled by Jesse in our garage. The real stands won’t look so bumpy.
This is what the new stand looks like with a keyboard on top of it.
We've been through a half-dozen iterations since last month. This is, we believe, the final version. The factory is currently getting quotations for injection molding tooling from a few suppliers. It's looking like about 25 days lead time to the first items coming off the production line. It currently looks like everything else will be ready to roll a few weeks before that. To try to ensure that the stands don't delay the PVT run, we're going to attempt to have the wood CNC factory do a run of 100 sets of wooden stands. We know that some folks are going to want wooden stands and hope to offer them as an after-market item later, too.
The new stands are shaped like.. eight legged starfish? The factory calls it them starfish, though we think of ‘em as a little bit more octopus-like. This shows how the two of them fit together. They’ll be black, not purple and green, though.
The plastic stands will be injection molded in two parts that are snapped and screwed together at the factory. We've been through a couple of iterations of the design for the internals of the stand, mostly focused on ensuring that the stand is sturdy, rigid and lightweight.
There was a point where the factory thought they were going to have to make custom tripod screws to screw the stands to the baseplates. Thankfully, they found a vendor with..a pretty broad product catalog.
These are a few of the screw options the vendor sent over, with an arrow pointing at the Mechanical Engineer’s recommendation.
The inside of the bottom half of the new stand design. Since this picture was taken, the factory’s added a bit of additional structure. Rest assured that the final article will be a much less noticeable black, with better fitting rubber pads.
The inside of the top half of the new stands.
Baseplates
After we removed the old flip-out feet, the baseplates needed to be updated to remove the cavities for the feet.
At the same time, we found that the plastic on the inside of the tripod mount didn't have enough extra headroom above it--if you screwed in a tripod screw that was a little bit too long, it was possible to damage the plastic. We ended up just adding a little bit of an additional air gap above the tripod screw.
As we've been working with the T3 sample base plates provided by the factory when Jesse was last in Shenzhen, we've found them to have just a little too much flex when you have something screwed into the tripod mount. This is largely due to deficiencies in the "ribbing" on the inside of the baseplates. As we started to look at the ribbing, we discovered that there were a number of places where the ribbing on the injection-molded baseplates didn't match the CNC-milled samples we'd seen earlier.
The T3 baseplate samples were pretty bad. There were places that the bits of ribbing didn’t even connect (like in the middle of this picture).
Simply fixing the mistakes made by the mold tooling company would have gone a long way to reducing base-plate flex, but since we already had to make significant changes to remove the feet, we took the opportunity to add better internal reinforcement. When the factory brought the updated design to their tooling factory, the tooling factory suggested additional changes. Over the past week, we've been going back and forth to try to get to something we can sign off on. That should happen in the next couple days. Once it does, the tooling modifications are estimated to take two weeks.
This baseplate design had some additional structure added to help reinforce the tripod mount at the injection molding factory’s suggestion.
Center bars
The center bars that join the two halves of the keyboard need only relatively minor design updates to remove the flip-out feet. Essentially, we're cutting off part of the tented center bar, making it half the height it was before. Unfortunately, that's something that's relatively hard to change in an injection mold. In order for a part to come out of the mold smaller, you need to put steel back into the mold (or recut it.) The lead time for center bar updates is the same as for the bottom plates--about two weeks.
Rails
The rails are the little bits on the bottom of the key plates that the center bars slide onto. When we wrote about the drop tests last month, we mentioned that the tapping screws securing the rails started to get a bit loose after the keyboard hit a concrete floor. The factory has updated the design of the rails to add brass inserts into the rails, so we can use machine screws instead of tapping screws.
The brass inserts are added into the injection molds and the rails are molded around the inserts, just like the tripod mount. When we asked about what sorts of modifications the mold needed to do this, we were surprised to learn that this gets done without any change to the tooling.
The nuts that will be inserted into the rails are brass, despite the comment to the contrary in these pictures.
An engineering drawing showing where the brass nuts will be inserted into the rails.
Enclosure
As we’ve been stress-testing the samples Jesse brought back from Shenzhen last month, we’ve been finding the fit between the plastic base plates and the wooden enclosures to be a very, very tight fit. Tight enough that we’re concerned that the plastic could put too much pressure on the wood, causing a crack somewhere down the line. We brought this up with the factory, who checked out all of the tolerances and found that the wood was a little bit (less than 1mm) fatter than it should be. They brought this up with the wood CNC factory who agreed, saying that it was likely a result of the post-milling finishing operations. The CNC factory said that they’d recommend some small adjustments to the thickness of the wood in a few places to give everything a bit more breathing room. A team from our factory is visiting the CNC operation on Wednesday to go over the details. Because the wood is milled rather than injection-molded, once we update the design, the lead time for the change is just a day or two of machine programming time.
The other enclosure-related item is the press-fit nuts we’re using to let you screw the base plate to the enclosure with machine screws. As we mentioned in a previous update, the factory didn’t like the knife-edge nuts we’d used previously. They prefer nuts that are just inserted vertically, rather than screwed in, saying that it leads to fewer broken parts. We had some concerns that the press-fit versions wouldn’t stay in place well, even when glued.
The wood factory sent us some pictures and video to show off just how strong the glue is. That’s a 10.4 kg table they’re using as a weight.
It took a bit of back and forth to find out what kind of glue they’re using. Early on, it sounded like they were recommending a cyanoacrylate superglue. That holds great, but gets brittle and is unlikely to do a good job bonding the metal to the wood. The glue they’re using is a wood furniture glue that should do a good job flowing around the exterior “bar-bell” shape of the nut and anchor it to the wood. The glue comes from the Chinese subsidiary of a major German adhesives company we know and trust. Interestingly, while it was easy to verify the brand and product line of the glue, the exact product ID is a China-only product. When we first called the manufacturer, they couldn’t find any record of it existing. We were a little bit concerned until we managed to track down references to it as a furniture glue on their Chinese website.
Keycaps
Last week, the factory reported to us that the keycap manufacturer had finished T5 - the fifth update to the tooling for the keycaps. The keycaps we showed in the last backer update were "T3" keycaps. They were the first version that had numbers molded on the inside. Some of the numbers were placed...idiosyncratically. And some of the ejector pins that help push the keycaps out of the injection mold after tooling were slightly...miscalibrated, resulting in visible dots on the top sides of the keycaps. On the inside of the keycaps, the T3 keystems were the right size, but were missing a 45 degree chamfer at their tips. That chamfer makes the keycaps much, much easier to insert into the keyswitches. The T4 keycap update corrected the keystem chamfers and most of the key numbers. The factory reported that some of the numbers were still hard to read, so they were being corrected for T5. Supposedly, the ejector pins have been correctly calibrated, too, but we won't know for sure until we have a set of keycaps to test.
A sample T3 keycap showing off the cosmetic issue caused by misaligned ejector pins.
The first set of sample keycaps we got from the factory were "natural" colored--a translucent yellow-white color. We've been working with the factory to up the light-transmission of the production keycaps.
The factory expects to send us a set of blank white T5 keycaps today, with a painted and engraved set of QWERTY keycaps to follow soon afterward. (As of this writing, we've seen a photograph of an airbill for the blank keycaps.) They were very curious about some aspects of our key layout. Attempting to explain to the factory exactly what an "any" key and a "butterfly" key are supposed to do was an amusing moment.
Key labels
While we've been reasonably on top of the QWERTY key labels for the Model 01, we've long known that we'd want help specifying the legends for any non-QWERTY layouts we end up offering. This month, we started setting up a forum site for the Model 01.
We made the decision that rather than just throwing the doors wide open, we'd start by inviting folks who filled out the key layout survey we promoted in the past few backer updates and expressed interest in helping to shape the layouts.
We feel pretty strongly that a public forum site for a product that nobody has yet isn't exactly a great experience. As we start to ship the first Model 01s, we'll make the forum public. Until then, we're happy to keep chatting in the Kickstarter comment thread.
To give you a taste of what folks are talking about for the alternate layouts, here are some sample Dvorak layout proposals.
If you're interested in helping to shape the Dvorak, Colemak or Runic key layouts, send mail to [email protected] with the subject "Forum invite" and we'll get you sorted out.
Packaging
This week, the factory's bringing in a company specializing in packaging design to propose a box design to us. We know roughly what we're looking for (and it won't be all that complex), but a packaging specialist will help design something robust and reliable that won't break the bank. Lead time on packaging is 7-10 days if it’s all cardboard, stretching to 2 weeks if we have plastic packaging.
Cables
We've been going back and forth with the factory about the USB Type C cables that will be shipped with the Model 01. What we've specified is a black 1.5 meter cable with a regular USB connector (USB A) on one side and a right-angle USB Type C connector on the other end. Right angle Type C connectors are still not the most common thing. Early on, the factory had some trouble sourcing them. The last time we were in Shenzhen, we found a couple of potential vendors. The factory has also found their own source, though theirs are a bit pricier than ours. They're getting samples from all the vendors to put through their paces. Lead times for thousands of cables is something like 10-15 days.
A 1.5 meter long right-angle Type C to USB A cable.
The short and long RJ45 cables we'll ship with the keyboards are a lot more straight-forward.
Screwdriver
Your Model 01 comes with source code and a screwdriver. Last week, the factory sent us photographs of some sample screwdrivers to pick from. They pushed back a bit when we brought up having the Keyboardio logo on the screwdrivers. They told us that the cost and lead-time of doing that would be prohibitive. It took a bit of back and forth before we discovered that they thought we wanted the screwdriver vendor to modify their injection molds to mold the logo into the screwdriver. While it would be really cool to have our logo literally baked into the screwdrivers, we've only been planning on having the logo screenprinted on the screwdriver. Once we were on the same page about the logo, the conversation went much more smoothly.
This is probably the screwdriver that will come with your Model 01
Schedule
Last month, we told you we were betting that we expected the first units to start shipping from the factory by the end of November. At this point, that's not entirely impossible, but it's relatively improbable.
Right now, the longest-leadtime items are the injection tooling for the new stands and the tooling updates for the baseplates and center bars. We can ship the 100 unit PVT run with CNC milled stands, but we can't ship it with the old baseplates and center bars.
Once the first PVT units are in customer hands and we've verified that things look alright, we'll ask the factory to start mass production. That doesn't mean that one week after PVT units are delivered, we'll have a warehouse full of several thousand Model 01s. Keyboards involve some hand assembly and hand testing (like just about everything). We'll ship your keyboards as quickly as the factory can make them, though.
At some point in the next month, we're probably going to be offline for most of a week as we welcome a new small person into the family. We'll post a birth announcement to Twitter ;)